


Arduino Nano Every with headers
Looking for the Nano Every? Check the Arduino Every - Pack solution!
Overview
The Nano Every is Arduino’s 5V compatible board in the smallest available form factor: 45x18mm!
The Arduino Nano is the preferred board for many projects requiring a small and easy to use microcontroller board. The small footprint and low price, make the Nano Every particularly suited for wearable inventions, low-cost robotics, electronic musical instruments, and general use to control smaller parts of a larger projects.
The Arduino Nano Every is an evolution of the traditional Arduino Nano board but features a lot more powerful processor, the ATMega4809. This will allow you to make larger programs than with the Arduino Uno (it has 50% more program memory), and with a lot more variables (the RAM is 200% bigger).
An Improved Arduino Nano
The board comes in two options: with or without headers, allowing you to embed the Nano Every inside any kind of inventions, including wearables. The board comes with tessellated connectors and no components on the B-side. These features allow you to solder the board directly onto your own design, minimizing the height of your whole prototype.
Oh, and did we mention the improved price? Thanks to a revised manufacturing process, the Arduino Nano Every costs a fraction of the original Nano … what are you waiting for? Upgrade now!
Get Many Nanos at Once
If you are in the situation of needing many boards for your classroom, or if you need to present a complex prototype with many functional blocks, there is also the possibility of getting an Arduino Nano Every pack with a discounted pack price, saving on the unit price of each board.
The pack is available in two sizes containing either 3 or 6 boards, without headers. Whether you want to minimize the size of your prototypes or share the joy of electronics with your friends, this is the best option you will find.
Get to Know More
To know more about the history of the Nano Every don’t miss the interview with Dario Pennisi, Arduino’s hardware and firmware development manager, who led the development of this board.
Getting Started
The Getting Started section contains all the information you need to configure your board, use the Arduino Software (IDE), and start tinkering with coding and electronics.
Need Help?
Check the Arduino Forum for questions about the Arduino Language, or how to make your own Projects with Arduino. Need any help with your Nano Every board please get in touch with the official Arduino User Support as explained in our Contact Us page.
Warranty
You can find here your board warranty information.
Tech specs
The Arduino Nano Every is based on the ATMega4809 microcontroller.
| Microcontroller | ATMega4809 (datasheet) |
| Operating Voltage | 5V |
| VIN min-MAX | 7-21V |
| DC Current per I/O Pin | 20 mA |
| DC Current for 3.3V Pin | 50 mA |
| Clock Speed | 20MHz |
| CPU Flash Memory | 48KB (ATMega4809) |
| SRAM | 6KB (ATMega4809) |
| EEPROM | 256byte (ATMega4809) |
| PWM Pins | 5 (D3, D5, D6, D9, D10) |
| UART | 1 |
| SPI | 1 |
| I2C | 1 |
| Analog Input Pins | 8 (ADC 10 bit) |
| Analog Output Pins | Only through PWM (no DAC) |
| External Interrupts | all digital pins |
| LED_BUILTIN | 13 |
| USB | Uses the ATSAMD11D14A (datasheet) |
| Length | 45 mm |
| Width | 18 mm |
| Weight | 5 gr (with headers) |
Conformities
Resources for Safety and Products
Manufacturer Information
The production information includes the address and related details of the product manufacturer.
Arduino S.r.l.
Via Andrea Appiani, 25
Monza, MB, IT, 20900
https://www.arduino.cc/
Responsible Person in the EU
An EU-based economic operator who ensures the product's compliance with the required regulations.
Arduino S.r.l.
Via Andrea Appiani, 25
Monza, MB, IT, 20900
Phone: +39 0113157477
Email: support@arduino.cc
Documentation
OSH: Schematics
The Arduino Nano Every is open-source hardware! You can build your own board using the following files:
EAGLE FILES IN .ZIP SCHEMATICS IN .PDF FRITZING IN .FZPZ
Pinout Diagram
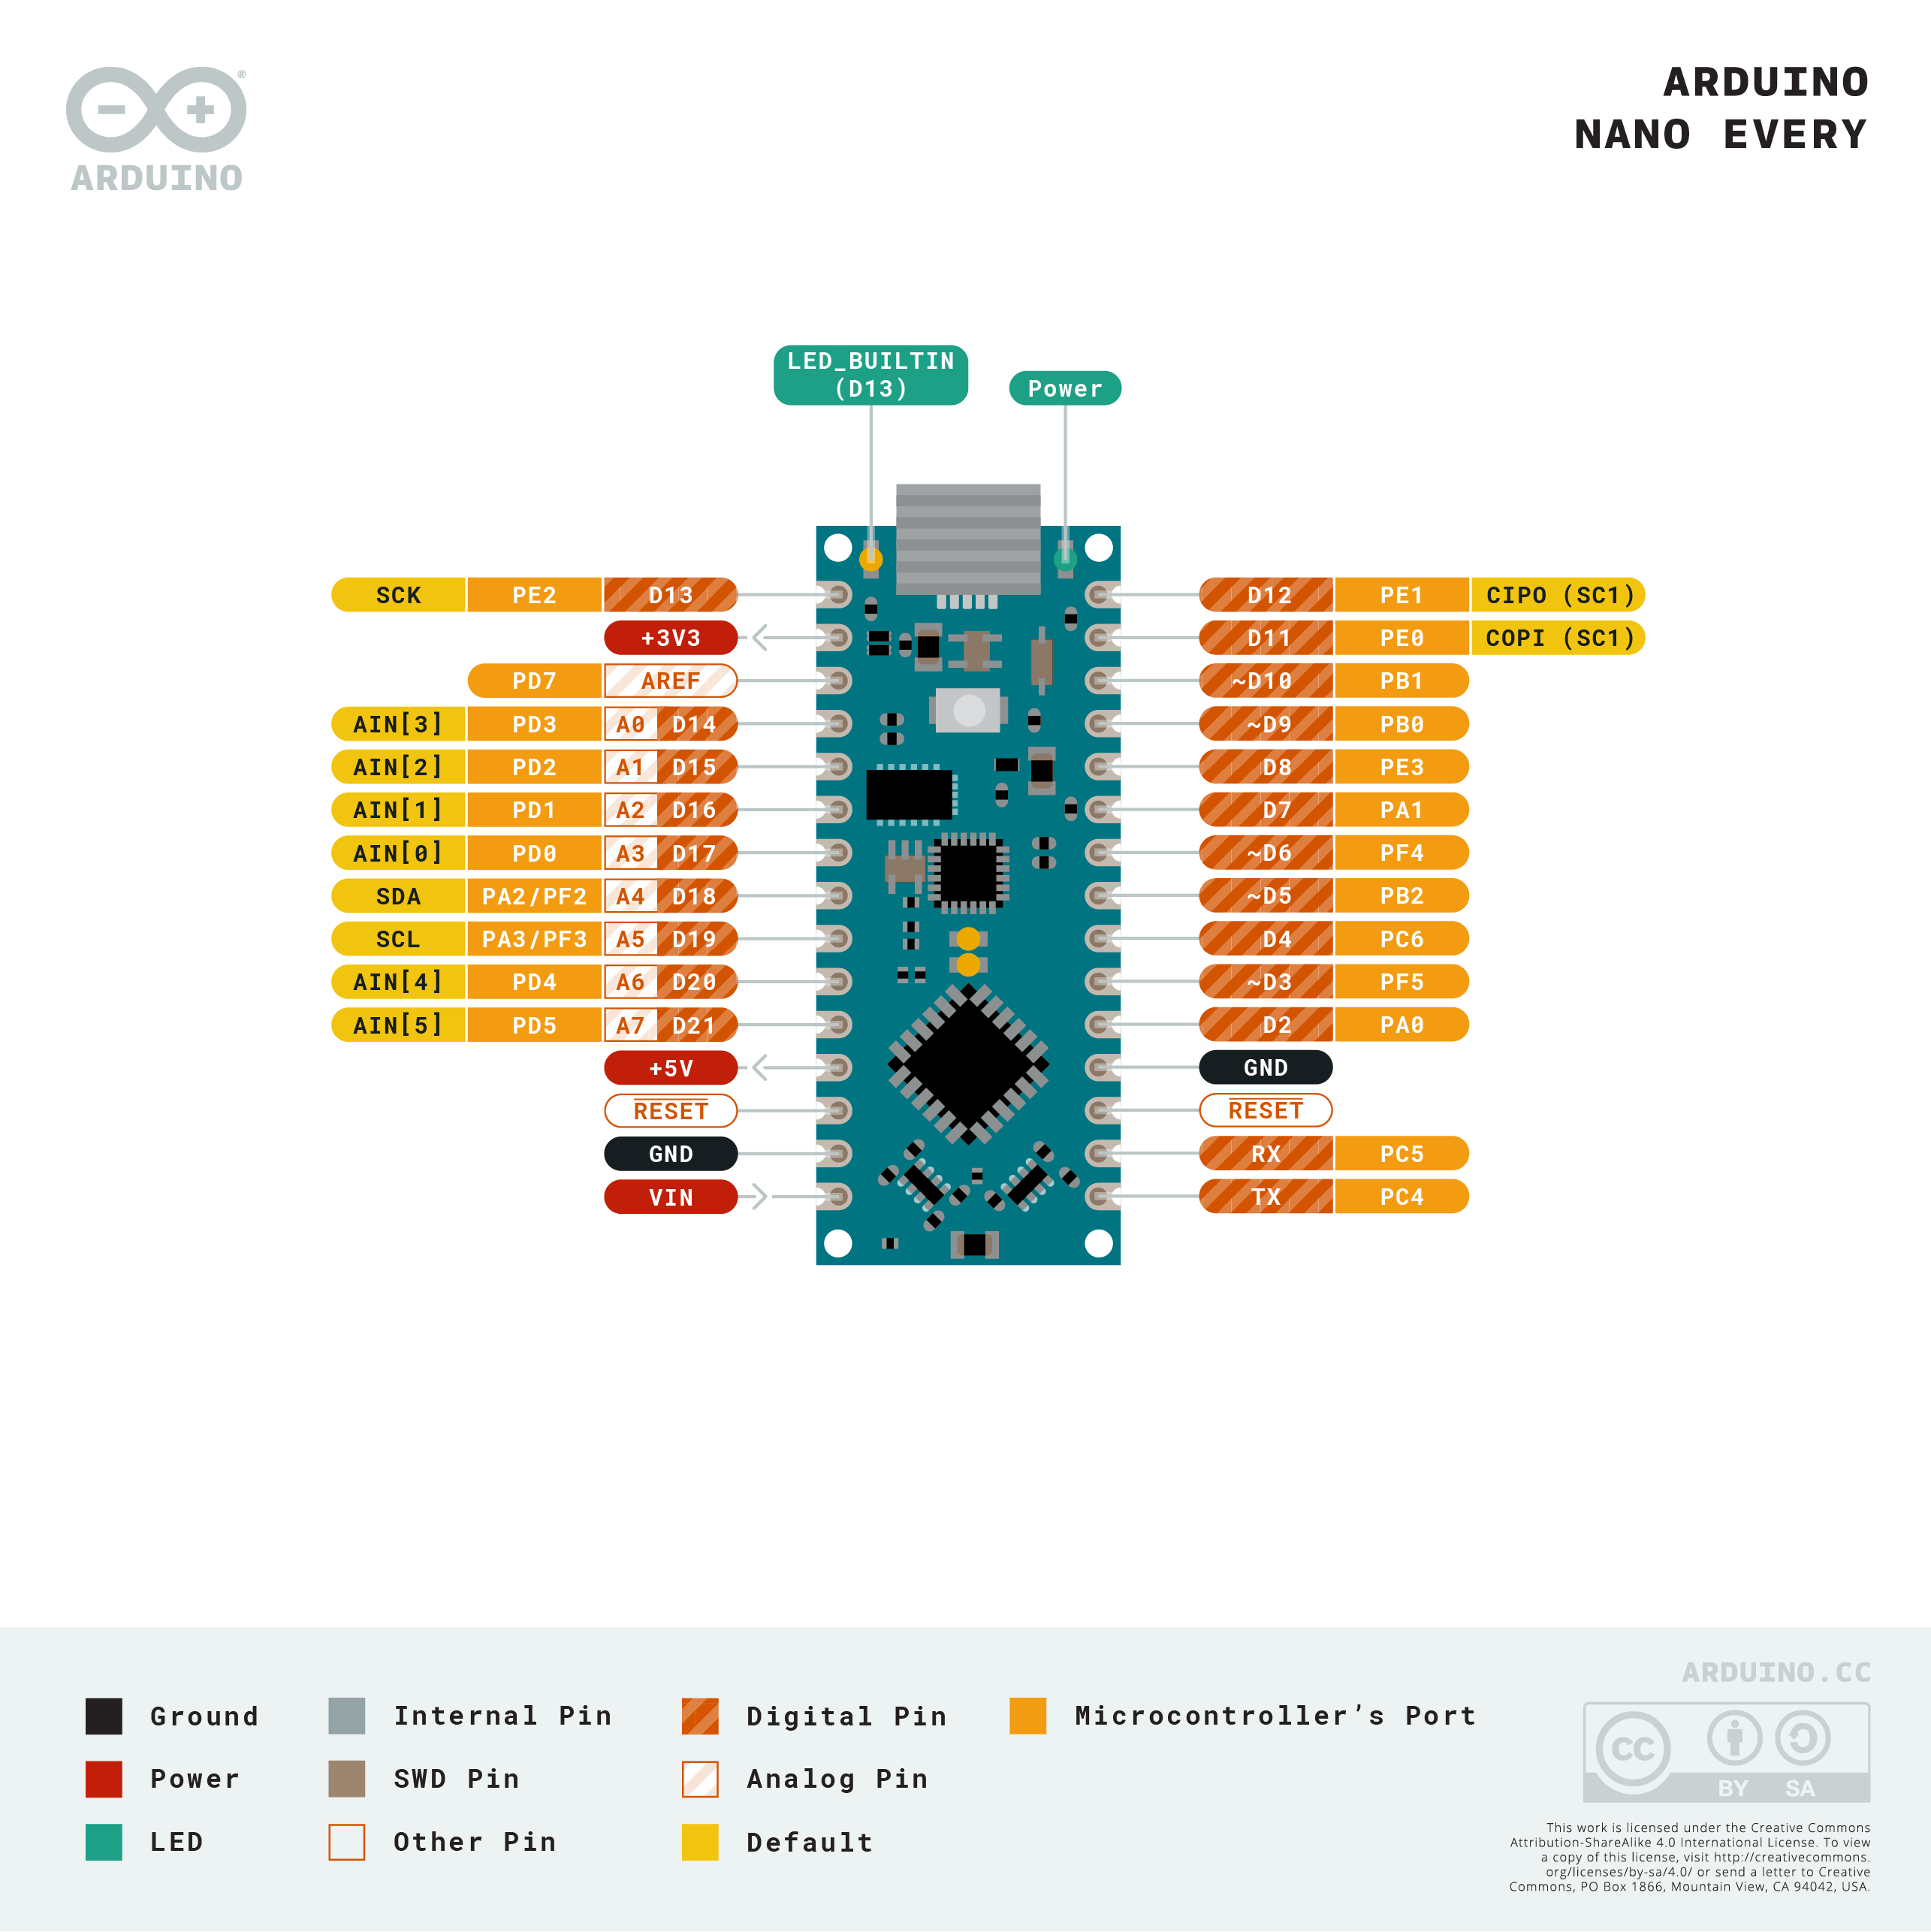
Download the full pinout diagram as PDF here.
Download the Fritzing file here.
Interactive Board Viewer
Learn more
Get Inspired
How Arduino Education helped educator James Jones boost students’ 21st century skills and robotics knowledge across 23 middle schools in Orlando, Florida. More and more teachers face the difficulty of instilling the right skills and knowledge, as well as a flexible mindset, that better prepare their students for future career opportunities. “Today, students need to be thinking about careers in middle school,” Jones said. “If students wait until they are juniors or seniors in high school to decide, their options are already getting slim. Finding a direction in middle school allows for research, job shadowing, and internships in high school. This will translate into more jobs that require more of these skills as part of the daily workplace. This way they know what a career really looks like, instead of jumping into a job and finding out that they are miserable.” The challenge: learning about careers you love at a young age Many countries have recently approved changes in their curricula and education systems to allow earlier access to technology in the classroom. In Finland, technology education is not a separate subject but a cross-curricular, interdisciplinary topic studied within various classes. In Florida, the Workforce Education law requires that students explore their career options during grades 6-8, at ages 12 to 14. How Arduino Education helped Jones spent last summer looking for a solution to assist him the following semester. He wanted to think big and reach as many schools as possible in Orange County, so he applied for and won the Title IV grant through the Every Student Succeeds Act (ESSA) program. He used the grant to fund 23 middle schools and chose Arduino Education’s products, CTC GO! Core Module and the Arduino Starter Kit, to improve students’ robotics, programming, and coding skills. “This past summer we ran two weeks of camps for rising eighth-graders. It was a transition camp at our feeder high school,"
FAQs
Batteries, Pins and board LEDs
- Batteries: the Nano Every has no battery connector, nor charger. You can connect any external battery of your liking as long as you respect the voltage limits of the board.
- Vin: This pin can be used to power the board with a DC voltage source. If the power is fed through this pin, the USB power source is disconnected. This pin is an INPUT. Respect the voltage limits of 7-21V to assure the proper functionality of the board.
- 5V: This pin outputs 5V from the board when powered from the USB connector or from the VIN pin of the board.
- 3.3V: This pin outputs 3.3V through the on-board voltage regulator.
- LED ON: This LED is connected to the 5V input from either USB or VIN.


