Arduino Certification Bundle: Kit & Exam
Sold outOfficially certify your knowledge of Arduino in the field of programming and electronics by taking the Arduino Certification exam.
Overview
The Arduino Certification exam + kit bundle includes an Arduino Starter Kit and access to the certification exam.
Developed in consultation with interaction designers and electronic engineering professionals as well as in regards to leading technology curriculum, the Arduino Certification exam assesses skills based upon exercises comprised of practical tasks from the Arduino Starter Kit.
To obtain the certificate, you will be requested to answer 36 questions over a period of 75 minutes.
Purchasing the bundle will grant you the Arduino Starter Kit and an activation code, which can be used to unlock 1 attempt at the Arduino Certification exam.
Purchasing the exam alone costs $30, and grants 1 attempt at the Arduino Certification.
Once the code has been redeemed, you have one year to activate the exam, otherwise the code will become invalid.
The exam is available in English. Spanish, Italian, German and Chinese.
You can try the demo to have a closer look at how the exam will be.
To learn more about the certification process, download now the user guide
To learn more about the Arduino Starter Kit, click here
Tech specs
EXAM SUBJECT AREAS
You will encounter questions that test your knowledge in relation to the following 8 main categories:
- Electricity. Understanding the concepts such as resistance, voltage, power and capacitance,and able to measure and calculate them.
- Reading circuits and schematics. Understanding how electronics are represented visually, and the ability to read and analyze electronic circuits.
- Arduino IDE. Understanding the functionality of the Arduino development environment, serial communication, libraries and errors.
- Arduino Boards. Understanding the constitution and capabilities of an Arduino board and the functions of its different parts.
- Frequency and Duty cycle. Understanding the concepts of Pulse Width Modulation (PWM) and frequency, and being able to calculate duty cycle.
- Electronic components. Understanding how various electronic components such as LEDs, sensors, buttons and motors work, and how to use them in a circuit.
- Programming syntax and semantics. Understanding the building blocks of the Arduino programming language such as functions, arguments, variables and loops.
- Programming logic. Ability to program various electronic components, read, analyze and troubleshoot Arduino code.
For further questions, contact support here.
Resources for Safety and Products
Manufacturer Information
The production information includes the address and related details of the product manufacturer.
Arduino s.r.l.
Via Andrea Appiani, 25
Monza, MB, IT, 20121
https://www.arduino.cc/
Responsible Person in the EU
An EU-based economic operator who ensures the product's compliance with the required regulations.
Arduino s.r.l.
Via Andrea Appiani, 25
Monza, MB, IT, 20121
Phone: +39 0113157477
Email: support@arduino.cc
Get Inspired
Using the Garmin LIDARLite v3HP, Arduino MKR WIFI 1010 and Pushsafer to detect an intruder and send a push notification to a smartphone.

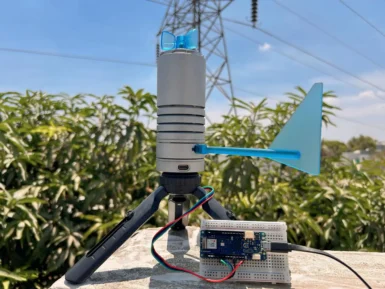
Being able to monitor the weather in real-time is great for education, research, or simply to analyze how the local climate changes over time. This project by Hackster.io user Pradeep explores how he was able to design a simple station outdoors that could communicate with a cloud-based platform for aggregating the sensed data. The board Pradeep selected is the Arduino MKR WiFi 1010 owing to its low-power SAM D21 microcontroller and Wi-Fi/BLE connectivity for easy, wireless communication. After configured, he connected a DFRobot Lark Weather Station, which contains sensors for measuring wind speed/direction, temperature, humidity, and barometric pressure — all in a compact device. Every second, the MKR WiFi 1010’s sketch polls the sensors for new data over I2C before printing it to USB. The cloud integration aspect was achieved by leveraging Qubitro’s platform to collect and store the data for later visualization and analysis. To set it up, Pradeep created a new device connection and copied the resulting MQTT endpoint/token into his sketch. Then once new data became ready, it got serialized into a JSON payload and sent to the topic where a variety of widgets could then show dials and charts of each weather-related metric. To read more about this DIY weather station, you can visit Pradeep’s project write-up here.


