


Overview
Through it, you can control a circuit of high voltage with low voltage, say 5V on the controller. There is an indicator LED on the board, which will light up when the controlled terminals get closed.
Tech specs
Specifications
|
Parameter |
V1.1 |
V1.2 |
|
Product Release Date |
27th Jan 2013 |
9th June 2014 |
|
Operating Voltage |
5V |
3.3V~5V |
|
Operating Current |
60mA |
100mA |
|
Relay Life |
100,000 Cycle |
100,000 Cycle |
|
Max Switching Voltage |
250VAC/30VDC |
250VAC/30VDC |
|
Max Switching Current |
5A |
5A |
Pinmapping
|
Grove-Relay |
Arduino |
|
GND |
GND |
|
VCC |
5V |
|
SIG |
D4 |
Get Inspired

Exploring the digital twin synthetic data generation and AI-oriented advancements on real-world shipping operations w/ NVIDIA Omniverse.
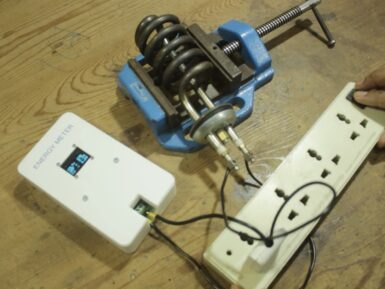
The primary appeal of microcontrollers is their versatility. They are, essentially, the embedded equivalent of computers — general purpose devices that can perform a wide range of functions. And to get the most out of a microcontroller, you’ll also want connectivity suitable for your application. That’s why we released the Arduino Nano Matter and YouTuber Mr Innovative has shared a great video illustrating how easy it is to build an energy meter using this new development board. The Nano Matter is based on the powerful Silicon Labs MGM240S, which has an Arm Cortex-M33 processor and support for a number of wireless connectivity options, including 802.15.4 (Zigbee and Thread), Bluetooth® Low Energy 5.3, Bluetooth® Mesh, and Matter. That makes the Nano Matter perfect for smart home and other Internet of Things applications. To demonstrate that, Mr Innovative created an energy meter that would be useful to many people around the world. This unit monitors the power flowing to any device or appliance connected to mains AC power. It displays information about that power consumption on a small OLED screen, and also sends the data over Bluetooth to a connected smartphone for logging. The Nano Matter can’t monitor mains AC voltage directly, so Mr Innovative used a ZMCT103C current transformer for the job. The Arduino receives its power from a 9V battery and the components fit inside a 3D-printed enclosure. A printed sticker label gives that a nice, smooth top finish.


