Arduino Alvik
With Arduino Alvik, innovators, students, and educators can step into the world of programming and robotics at any level - helping you go further with every move.
Overview
Alvik simplifies coding and complex robot projects, enabling users of all levels to immerse themselves in the exciting world of programming and robotics. It’s also a cross-discipline tool that bridges the gap between education and the future of robotics with CSTA and NGSS-Aligned free courses. This innovative and versatile robot makes learning and creating more accessible and fun than ever before.
Key benefits include:
- Start programming in no time: Powered by the versatile Nano ESP32, Alvik streamlines the learning curve in robotics with its comprehensive programming suite that includes block-based coding for primary school students, MicroPython and Arduino language for K12 and learner with different levels who are ready to explore the world of coding and robotics.
- Unlock robotic potential with multiple integrated sensors: Alvik’s Time of Flight, RGB color and line-following array sensors, along with its 6-axis gyroscope and accelerometer, allow users to tackle a range of innovative, real-world projects. From an obstacle avoidance robot to a smart warehouse automation robot car, the possibilities are endless!
- Design your own experience by expanding Alvik’s capabilities: Alvik comes equipped with LEGO® Technic™ connectors, allowing users to personalize the robot and expand its capabilities. Additionally, it features M3 screw connectors for custom 3D or laser-cutter designs.
- Amplify Alvik’s flexibility for dynamic movement: The Servo, I2C Grove, and I2C Qwiic connectors allow users to expand Alvik’s potential and take robotics projects to a whole new level. Add motors for controlling movement and robotic arms, or integrate extra sensors for data collection and analysis – the choice is yours.
Other Features
Its small yet mighty design allows learners to bring imaginative ideas into reality, starting from your first ever line of code to the most complex technological developments. Alvik’s pocket-size build makes it an ideal companion for various learning environments, whether that’s in a classroom, makerspace, home, or even in your garage.
Alvik’s rechargeable and easy-to-replace battery ensures continuous learning sessions and uninterrupted creation experience. Replaceable batteries can also extend the overall lifespan of the robot, reducing the need to replace the entire unit when the original batteries degrade over time and saving costs.
CSTA and NGSS-Aligned Curriculum
Alvik comes with 2 project-based learning lessons and activities with both block-based coding and MicroPython language which encourage students and innovators to explore technology through hands-on collaboration, preparing them for real-world challenges.
The content includes getting started, hardware, software, and real-life use activities. The content includes getting started, hardware, software, and real-life use activities. These activities are designed to build learners' critical thinking, problem-solving, and teamwork skills. Primary school: Block-based coding & Robotics
 Secondary and High School: Explore Robotics and MicroPython
Need help?
Check the Arduino Forum for questions about the Arduino Language, or how to make your own Projects with Arduino. You can also find out more about Arduino Cloud for Schools here.
If you need any help with your product, please get in touch with the official Arduino User Support as explained in our Contact Us page.
Tech specs
| Alvik main controller | Arduino Nano ESP32:
|
| Alvik on-board Core | STM32 Arm® Cortex®-M4 32 Bit |
| Power supply | Nano ESP-32 USB-C® rechargeable and replaceable 18650 Li-Ion battery (included) |
| Programming language | MicroPython, Arduino & *block-based programming |
| Connectivity | Wi-Fi®, Bluetooth® LE |
| Inputs | Time of Flight Distance Sensor - up to 350 cm RGB Color Sensor 6-axis Gyroscope-Accelerometer Line follower Array (x3) Touchable Buttons (x7) |
| Outputs | 2x RGB LEDs 6V Motors - No- load speed 96 rpm, No- load current 70 mA |
| Extensions | LEGO® Technic™ connectors (x4) M3 screw connectors (x8) Servo motor I2C Grove I2C Qwiic |
*block-based programming will be supported soon.
Conformities
Resources for Safety and Products
Manufacturer Information
The production information includes the address and related details of the product manufacturer.
Arduino S.r.l.
Via Andrea Appiani, 25
Monza, MB, IT, 20900
https://www.arduino.cc/
Responsible Person in the EU
An EU-based economic operator who ensures the product's compliance with the required regulations.
Arduino S.r.l.
Via Andrea Appiani, 25
Monza, MB, IT, 20900
Phone: +39 0113157477
Email: support@arduino.cc
Documentation
Learn more
Get Inspired
Using the Garmin LIDARLite v3HP, Arduino MKR WIFI 1010 and Pushsafer to detect an intruder and send a push notification to a smartphone.

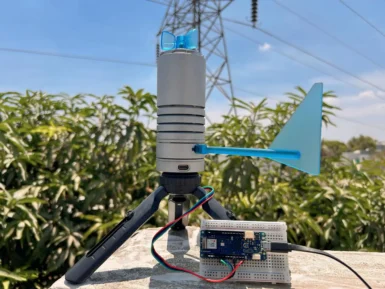
Being able to monitor the weather in real-time is great for education, research, or simply to analyze how the local climate changes over time. This project by Hackster.io user Pradeep explores how he was able to design a simple station outdoors that could communicate with a cloud-based platform for aggregating the sensed data. The board Pradeep selected is the Arduino MKR WiFi 1010 owing to its low-power SAM D21 microcontroller and Wi-Fi/BLE connectivity for easy, wireless communication. After configured, he connected a DFRobot Lark Weather Station, which contains sensors for measuring wind speed/direction, temperature, humidity, and barometric pressure — all in a compact device. Every second, the MKR WiFi 1010’s sketch polls the sensors for new data over I2C before printing it to USB. The cloud integration aspect was achieved by leveraging Qubitro’s platform to collect and store the data for later visualization and analysis. To set it up, Pradeep created a new device connection and copied the resulting MQTT endpoint/token into his sketch. Then once new data became ready, it got serialized into a JSON payload and sent to the topic where a variety of widgets could then show dials and charts of each weather-related metric. To read more about this DIY weather station, you can visit Pradeep’s project write-up here.


