


Make Your UNO Soldering Bundle
With this bundle you have all the tools and components needed to follow the experience of building your very own Arduino UNO and the synth shield.
Overview
Begin your journey to become a maker with the Make Your UNO Soldering Bundle, which includes the Arduino Make Your UNO Kit and all the needed tools to build a soldering station at home.
With the Arduino Make Your UNO Kit you will learn the basics of electronics by assembling your Arduino UNO and become familiar with soldering by mounting every single component.
The Arduino Soldering Kit contains all the tools and safety gear needed to set your very own soldering station. The temperature of the soldering iron included in this kit can be adjusted within the range of 200°C to 450°C. Additionally, it has an easy-to-use mechanism to exchange the soldering tips.
Tech specs
The Soldering Kit includes:
- 60 Watts - 220V soldering iron with adjustable temperature
- 5 tips for soldering iron
- 1 stand for soldering iron
- Lead-free solder wire
- Safety glasses
- Wire cutter
- Precision Tweezers
The Arduino Make Your UNO Kit contains:
- Arduino Make Your UNO
- 1 x Make Your UNO PCB
- 1 x USB C Serial adapter Board
- 7 x Resistors 1k Ohm
- 2 x Resistors 10k Ohm
- 2 x Resistors 1M Ohm
- 1 x Diode (1N4007)
- 1 x 16MHz Crystal
- 4 x Yellow LEDs
- 1 x Green LED
- 1 x Push-Button
- 1 x MOSFET
- 1 x LDO (3.3V)
- 1 x LDO (5V)
- 3 x Ceramic capacitors (22pF)
- 3 x Electrolytic capacitors (47uF)
- 7 x Polyester capacitors (100nF)
- 1 x Socket for ATMega 328p
- 2 x I/O Connectors
- 1 x Connector header 6 pins
- 1 x Barrel jack connector
- 1 x ATmega 328p Microcontroller
- Arduino Audio Synth
- 1 x Audio Synth PCB
- 1 x Resistor 100k Ohm
- 1 x Resistor 10 Ohm
- 1 x Audio amplifier (LM386)
- 1 x Ceramic capacitors (47nF)
- 1 x Electrolytic capacitors (47uF)
- 1 x Electrolytic capacitors (220uF)
- 1 x Polyester capacitor (100nF)
- 4 x connectors pin header
- 6 x potentiometer 10k Ohm with plastic knobs
- Spare parts
- 2 x Electrolytic capacitors (47uF)
- 2 x Polyester capacitor (100nF)
- 2 x Ceramic capacitors (22pF)
- 1 x Push-Button
- 1 x Yellow LEDs
- 1 x Green LED
- Mechanical parts
- 5 x Spacers 12mm
- 11 x Spacers 6mm
- 5 x screw nuts
- 2 x screws 12mm
Resources for Safety and Products
Manufacturer Information
The production information includes the address and related details of the product manufacturer.
Arduino S.r.l.
Via Andrea Appiani, 25
Monza, MB, IT, 20900
https://www.arduino.cc/
Responsible Person in the EU
An EU-based economic operator who ensures the product's compliance with the required regulations.
Arduino S.r.l.
Via Andrea Appiani, 25
Monza, MB, IT, 20900
Phone: +39 0113157477
Email: support@arduino.cc
Documentation
Get Inspired
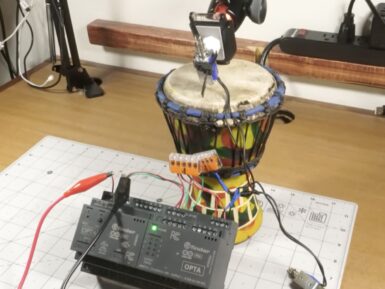
Makers have long asked the question “why bother with an expensive PLC when I can just use an Arduino?” The answer comes down to the priorities and needs of industrial clients. In a factory automation setting, the client will prioritize durability, reliability, and serviceability over the one-time purchase price of the device itself. But to prove that Arduino’s professional turnkey solutions are just as easy to use as their developer-focused educational counterparts, Jeremy Cook leveraged an Arduino Opta micro PLC to build a drum machine. This isn’t any old drum machine that plays sound samples or synthesized notes, but rather a robotic drum machine that makes noise by banging on stuff like a true percussion instrument. Cook could have built this with any Arduino board and a few relays, but instead chose to implement the Opta and new Opta Digital Expansion. That is robust enough for serious commercial and industrial applications, but is still simple to program with the familiar Arduino IDE. Programmers can also use conventional PLC languages if they prefer. In this case, Cook made noise with relays and solenoids. The Opta has four built-in relays and Cook’s sketch flips one of them to make a sound analogous to a hi-hat. Cook added an Arduino Pro Opta Ext D1608S module with its solid-state relays for the other two “drums.” One of those fires a solenoid that taps a small hand drum (the kick drum sound), while the other controls a solenoid that hits a power supply enclosure (the snare sound). Together, those three sounds can cover the basics of a drum track. Cook’s sketch is a drum sequencer program that stores each sound sequence as array, looping through them until turned off. An Opta may be overkill for a project like this one, but this does a great job of demonstrating the ease at which an Arduino user can transition to professional PLC work.


