


Overview
Learn the basics of electronics by assembling manually your Arduino UNO, become familiar with soldering by mounting every single component, and then unleash your creativity with the only kit that becomes a synth!
The Arduino Make Your UNO kit is really the best way to learn how to solder. And when you are done, the packaging allows you to build a synth and make your music.
A kit with all the components to build your very own Arduino UNO and audio synthesizer shield.
The Make Your UNO Kit comes with a complete set of instructions in a dedicated content platform. This includes video material, a 3D interactive viewer for following detailed instructions, and how to program your board once it is finished.
Enhance your experience with the Make Your UNO Soldering Bundle: it includes the Arduino Make Your UNO Kit and all the needed tools to build a soldering station at home.
Tech specs
This kit contains:
- Arduino Make Your UNO
- 1 x Make Your UNO PCB
- 1 x USB C Serial adapter Board
- 7 x Resistors 1k Ohm
- 2 x Resistors 10k Ohm
- 2 x Resistors 1M Ohm
- 1 x Diode (1N4007)
- 1 x 16MHz Crystal
- 4 x Yellow LEDs
- 1 x Green LED
- 1 x Push-Button
- 1 x MOSFET
- 1 x LDO (3.3V)
- 1 x LDO (5V)
- 3 x Ceramic capacitors (22pF)
- 3 x Electrolytic capacitors (47uF)
- 7 x Polyester capacitors (100nF)
- 1 x Socket for ATMega 328p
- 2 x I/O Connectors
- 1 x Connector header 6 pins
- 1 x Barrel jack connector
- 1 x ATmega 328p Microcontroller
- Arduino Audio Synth
- 1 x Audio Synth PCB
- 1 x Resistor 100k Ohm
- 1 x Resistor 10 Ohm
- 1 x Audio amplifier (LM386)
- 1 x Ceramic capacitors (47nF)
- 1 x Electrolytic capacitors (47uF)
- 1 x Electrolytic capacitors (220uF)
- 1 x Polyester capacitor (100nF)
- 4 x connectors pin header
- 6 x potentiometer 10k Ohm with plastic knobs
- Spare parts
- 2 x Electrolytic capacitors (47uF)
- 2 x Polyester capacitor (100nF)
- 2 x Ceramic capacitors (22pF)
- 1 x Push-Button
- 1 x Yellow LEDs
- 1 x Green LED
- Mechanical parts
- 5 x Spacers 12mm
- 11 x Spacers 6mm
- 5 x screw nuts
- 2 x screws 12mm
*This kit doesn’t include soldering iron or soldering tin.
Resources for Safety and Products
Manufacturer Information
The production information includes the address and related details of the product manufacturer.
Arduino S.r.l.
Via Andrea Appiani, 25
Monza, MB, IT, 20900
https://www.arduino.cc/
Responsible Person in the EU
An EU-based economic operator who ensures the product's compliance with the required regulations.
Arduino S.r.l.
Via Andrea Appiani, 25
Monza, MB, IT, 20900
Phone: +39 0113157477
Email: support@arduino.cc
Documentation
Learn more
Get Inspired

Build a cool display with the Arduino Giga Display - showcases using LVGL to show a graph of the on board mic, imu sensor and rgb led
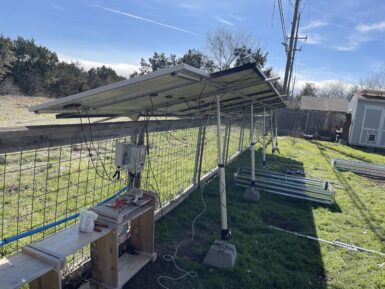
The EV (electric vehicle) versus ICE (internal combustion engine) debate is more complicated that it may seem, but one fact is quite simple: it is much easier to generate electricity at home than it is to refine fossil fuels. This means that it is possible power a vehicle for free after the initial investment. But doing so takes quite a lot of hardware, which is why Shawn Murphy developed this charging system controlled by an Arduino GIGA R1 WiFi. Murphy owns a Ford Lightning electric pickup truck, which is inefficient by EV standards thanks to its weight. But even at just two miles per kWh of electricity, he estimates that he can break even on the cost of his solar charging system within four to five years. After that, the electricity to power the Ford will, essentially, be free. Any excess energy can power his home or feed back into the grid. Just powering the truck alone will require a lot of electricity, so Murphy acquired 10 used 360-watt solar panels. Those feed to a battery backup array, which supplies power to the Ford charging station. To maximize efficiency, Murphy wants the solar panels to pivot on one axis to follow the sun. He estimates that will increase their output by 20-25% throughout the day, which is a significant amount of energy with a solar panel array this large. An Arduino GIGA R1 WiFi board controls the tilt of the panels via linear actuators. Murphy originally used “dumb” actuators, but is switching to “smart” models from Progressive Automations that include positional feedback through Hall effect sensors. A GIGA Display Shield gives Murphy access to an interface, which he can also access through the Arduino Cloud. In addition to controlling the linear actuators, the Arduino monitors power generation and consumption. This is still a work in progress as Murphy continues to make improvements, but he’s well on his way to “free” energy for his truck.
FAQs
Do I need extra components apart from the ones contained in the kit?
No extra components are needed, however take into account that soldering iron and soldering tin are not included in the kit.
Where can I find the step by step guide?
The step by step guide can be found at makeyouruno.arduino.cc
Can I use any other shield with the Make Your UNO board?
Yes, the Make your UNO board is compatible with shields that are compatible with the Arduino UNO R3.


