


Arduino Nano 33 BLE Sense Rev2 with headers
An AI enabled board in the shape of the classic Nano board, with all the sensors to start building your next project right away.
Overview
The Arduino Nano 33 BLE Sense Rev2 with headers is Arduino’s 3.3V AI enabled board in the smallest available form factor with a set of sensors that will allow you without any external hardware to start programming your next project, right away.
With the Arduino Nano 33 BLE Sense Rev2, you can:
- Build wearable devices that using AI can recognize movements.
- Build a room temperature monitoring device that can suggest or modify changes in the thermostat.
- Build a gesture or voice recognition device using the microphone or the gesture sensor together with the AI capabilities of the board.
The main feature of this board, besides the complete selection of sensors, is the possibility of running Edge Computing applications (AI) on it using TinyML. Learn how to use the Tensor Flow Lite library following this instructions or learn how to train your board using Edge Impulse.
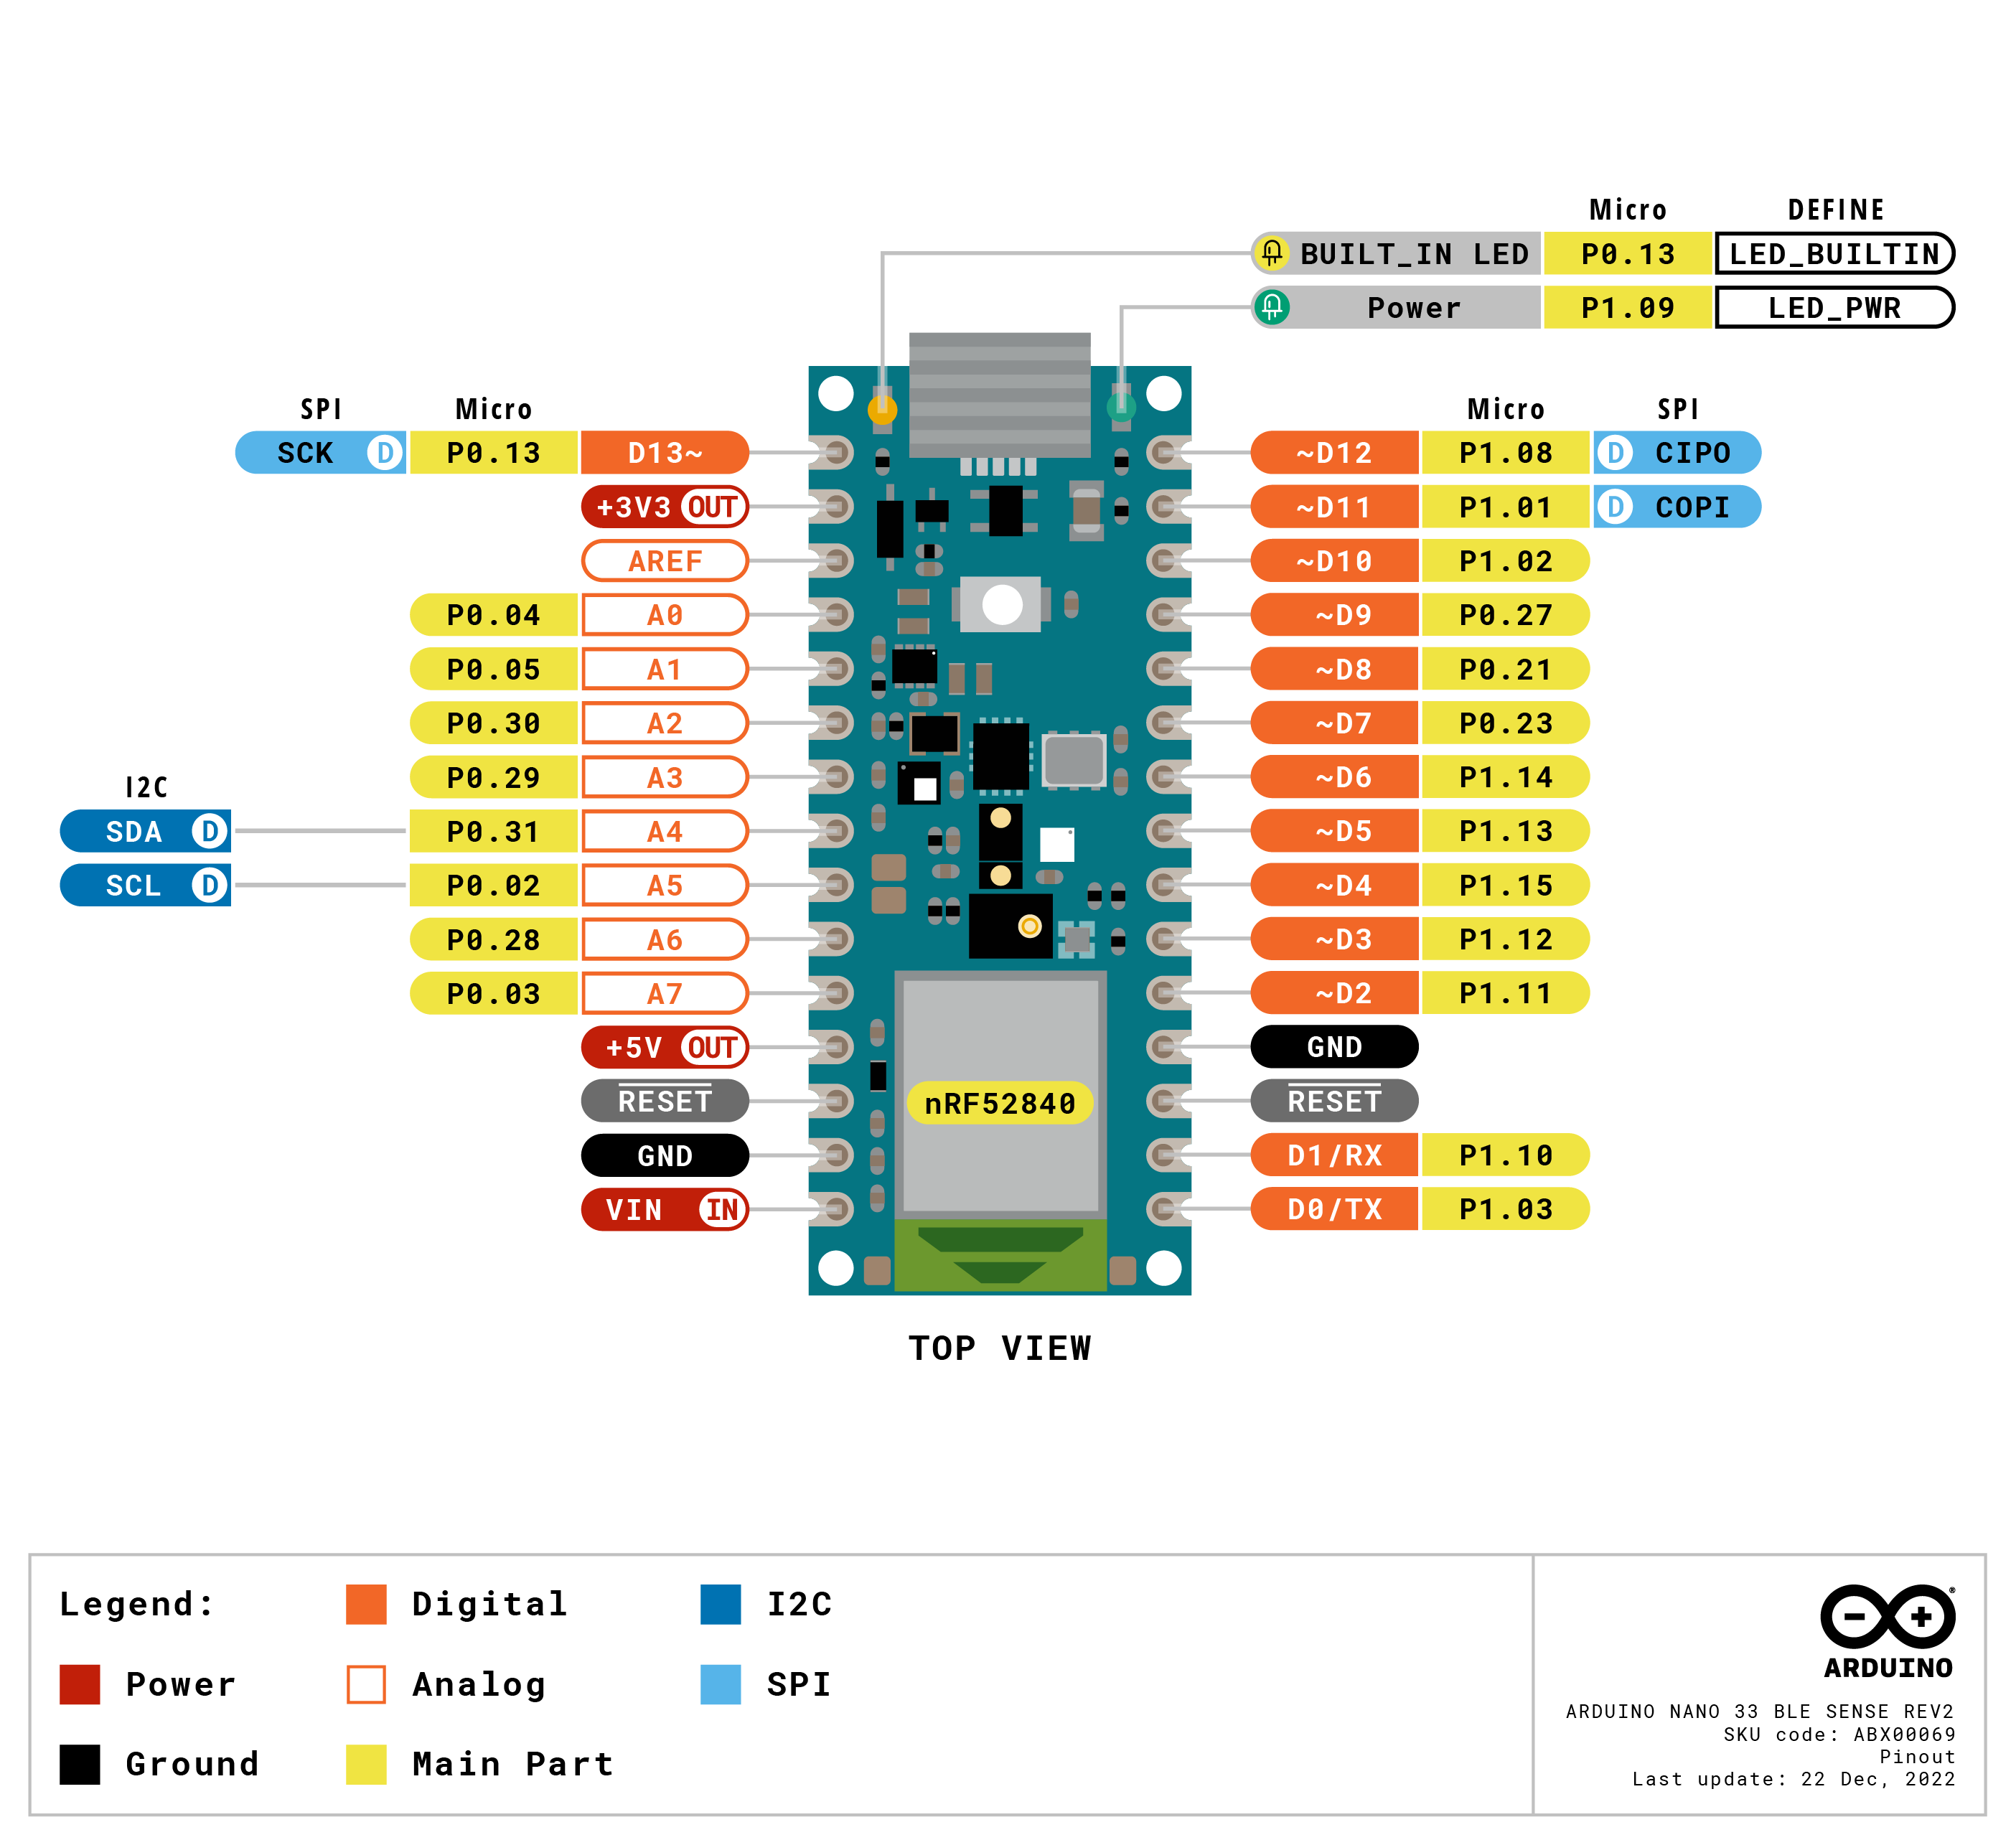
Tech specs
|
Microcontroller |
nRF52840 (datasheet) |
|
Operating Voltage |
3.3V |
|
Input Voltage (limit) |
21V |
|
DC Current per I/O Pin |
15 mA |
|
Clock Speed |
64MHz |
|
CPU Flash Memory |
1MB (nRF52840) |
|
SRAM |
256KB (nRF52840) |
|
EEPROM |
none |
|
Digital Input / Output Pins |
14 |
|
PWM Pins |
all digital pins |
|
UART |
1 |
|
SPI |
1 |
|
I2C |
1 |
|
Analog Input Pins |
8 (ADC 12 bit 200 k samples) |
|
Analog Output Pins |
Only through PWM (no DAC) |
|
External Interrupts |
all digital pins |
|
LED_BUILTIN |
13 |
|
USB |
Native in the nRF52840 Processor |
|
IMU |
|
|
Microphone |
MP34DT06JTR (datasheet) |
|
Gesture, light, proximity, color |
APDS9960 (datasheet) |
|
Barometric pressure |
LPS22HB (datasheet) |
|
Temperature, humidity |
HS3003 (datasheet) |
Conformities
Resources for Safety and Products
Manufacturer Information
The production information includes the address and related details of the product manufacturer.
Arduino S.r.l.
Via Andrea Appiani, 25
Monza, MB, IT, 20900
https://www.arduino.cc/
Responsible Person in the EU
An EU-based economic operator who ensures the product's compliance with the required regulations.
Arduino S.r.l.
Via Andrea Appiani, 25
Monza, MB, IT, 20900
Phone: +39 0113157477
Email: support@arduino.cc
Documentation
Learn more
Get Inspired

Build a cool display with the Arduino Giga Display - showcases using LVGL to show a graph of the on board mic, imu sensor and rgb led
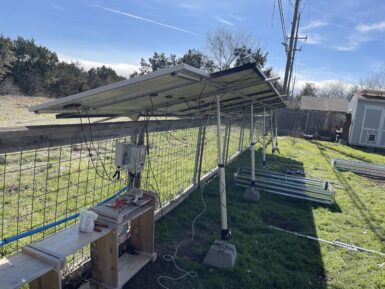
The EV (electric vehicle) versus ICE (internal combustion engine) debate is more complicated that it may seem, but one fact is quite simple: it is much easier to generate electricity at home than it is to refine fossil fuels. This means that it is possible power a vehicle for free after the initial investment. But doing so takes quite a lot of hardware, which is why Shawn Murphy developed this charging system controlled by an Arduino GIGA R1 WiFi. Murphy owns a Ford Lightning electric pickup truck, which is inefficient by EV standards thanks to its weight. But even at just two miles per kWh of electricity, he estimates that he can break even on the cost of his solar charging system within four to five years. After that, the electricity to power the Ford will, essentially, be free. Any excess energy can power his home or feed back into the grid. Just powering the truck alone will require a lot of electricity, so Murphy acquired 10 used 360-watt solar panels. Those feed to a battery backup array, which supplies power to the Ford charging station. To maximize efficiency, Murphy wants the solar panels to pivot on one axis to follow the sun. He estimates that will increase their output by 20-25% throughout the day, which is a significant amount of energy with a solar panel array this large. An Arduino GIGA R1 WiFi board controls the tilt of the panels via linear actuators. Murphy originally used “dumb” actuators, but is switching to “smart” models from Progressive Automations that include positional feedback through Hall effect sensors. A GIGA Display Shield gives Murphy access to an interface, which he can also access through the Arduino Cloud. In addition to controlling the linear actuators, the Arduino monitors power generation and consumption. This is still a work in progress as Murphy continues to make improvements, but he’s well on his way to “free” energy for his truck.
FAQs
What is the difference between Rev1 and Rev2?
There has been some changes in the sensor between both revisions:
- Replacement of IMU from LSM9DS1 (9 axis) for a combination of two IMUs (BMI270 - 6 axis IMU and BMM150 - 3 axis IMU).
- Replacement of temperature and humidity sensor from HTS221 for HS3003.
- Replacement of microphone from MP34DT05 to MP34DT06JTR.
Additionally some components and the changes have been done in order to improve the experience of the users:
- Replacement of power supply MPM3610 for MP2322.
- Addition of VUSB soldering jumper on the top side of the board.
- New test point for USB, SWDIO and SWCLK.
Do I need to change my sketch used in the previous revision?
For sketches done using the libraries like LSM9DS1 for the IMU or HTS221 for the temperature and humidity sensor, for the new revision this libraries must be changed to Arduino_BMI270_BMM150 for the new combined IMU and Arduino_HS300x for the new temperature and humidity sensor.


