Arduino Starter Kit Multi-language
Get started with electronics quickly and easily - no prior experience required. Available versions: Deutsch (DE), English (EN), Español (ES), Français (FR), Italiano (IT), 中文 (CN), 한글 (KO) عربى (ARA)
Overview
Quickly and easily get started with learning electronics using the Arduino Starter Kit, which have a universal appeal to STEM fans at home, businesses in STEAM industries, and schools alike. No prior experience is required, as the kits introduce both coding and electronics through fun, engaging, and hands-on projects. You can use the starter kit to teach students about current, voltage, and digital logic as well as the fundamentals of programming. There’s an introduction to sensors and actuators and how to understand both digital and analog signals. Within all this, you’ll be teaching students how to think critically, learn collaboratively, and solve problems.
Projects you can make:
- 01 GET TO KNOW YOUR TOOLS an introduction to the basics
- 02 SPACESHIP INTERFACE design the control panel for your starship
- 03 LOVE-O-METER measure how hot-blooded you are
- 04 COLOR MIXING LAMP produce any color with a lamp that uses light as an input
- 05 MOOD CUE clue people in to how you're doing
- 06 LIGHT THEREMIN create a musical instrument you play by waving your hands
- 07 KEYBOARD INSTRUMENT play music and make some noise with this keyboard
- 08 DIGITAL HOURGLASS a light-up hourglass that can stop you from working too much
- 09 MOTORIZED PINWHEEL a colored wheel that will make your head spin
- 10 ZOETROPE create a mechanical animation you can play forward or reverse
- 11 CRYSTAL BALL a mystical tour to answer all your tough questions
- 12 KNOCK LOCK tap out the secret code to open the door
- 13 TOUCHY-FEEL LAMP a lamp that responds to your touch
- 14 TWEAK THE ARDUINO LOGO control your personal computer from your Arduino
- 15 HACKING BUTTONS create a master control for all your devices!
Once you’ve mastered this knowledge, you’ll have a palette of software and circuits that you can use to create something beautiful, and make someone smile with what you invent. Then build it, hack it and share it. You can find the Arduino code for all these projects within the Arduino IDE, click on File / Examples / 10.StarterKit.
Have a look at these video tutorials for a project by project walk-through.
Pictures shown are for illustration purpose only. Actual product may vary due to product enhancement.
Need Help?
- On the Software on the Arduino Forum
- On the Product itself through our Customer Support
Tech specs
The Starter Kit includes:
1 Projects Book (170 pages),
1 Arduino Uno,
1 USB cable,
1 Breadboard 400 points,
70Solid core jumper wires,
1 Easy-to-assemble wooden base,
1 9v battery snap,
1 Stranded jumper wires (black),
1 Stranded jumper wires (red),
6 Phototransistor,
3 Potentiometer 10kOhms,
10Pushbuttons,
1 Temperature sensor [TMP36],
1 Tilt sensor,
1 alphanumeric LCD (16x2 characters),
1LED (bright white),
1 LED (RGB),
8 LEDs (red),
8 LEDs (green),
8 LEDs (yellow),
3 LEDs (blue),
1 Small DC motor 6/9V,
1 Small servo motor,
1 Piezo capsule [PKM22EPP-40],
1 H-bridge motor driver [L293D],
1 Optocouplers [4N35],
2 Mosfet transistors [IRF520],
3 Capacitors 100uF,
5 Diodes [1N4007],
3 Transparent gels (red, green, blue),
1 Male pins strip (40x1),
20 Resistors 220 Ohms,
5Resistors 560 Ohms,
5 Resistors 1 kOhms,
5 Resistors 4.7 kOhms,
20 Resistors 10 kOhms,
5Resistors 1 MOhms,
5 Resistors 10 MOhms
Get Inspired
Print a claw on your 3D printer and use a myoelectric sensor to control it.

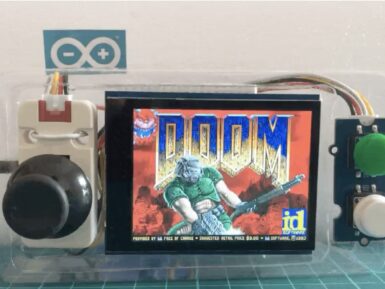
"But can it run Doom?" is more than just a joke in the tech world. It is also a decent litmus test for the computing power of hardware. That test isn't very relevant for modern computers, but it is still worth asking when discussing microcontrollers. Microcontrollers vary in dramatically in processing power and memory, with models to suit every application. But if you have an Arduino Nano ESP32 board, you can run Doom as Naveen Kumar has proven. The Nano ESP32 is a small IoT development board for the ESP32-S3 microcontroller, featuring Wi-Fi® and Bluetooth® connectivity. It also has a relatively high clock speed and quite a lot of memory: 240MHz and 512kB SRAM, respectively. That still isn't enough to meet the requirements of the original Doom release, which needed a lot more RAM. But Kumar demonstrates the use of an MCU-friendly port that runs well on this more limited hardware. Want to give it a try yourself? You'll need the Nano ESP32, an Adafruit 2.8" TFT LCD shield, an M5Stack joystick, a Seeed Studio Grove dual button module, a breadboard, and some jumper wires to create a simple handheld console. You'll have to compile and flash the Retro-Go firmware, which was designed specifically for running games like Doom on ESP32-based devices. You can then load the specialized WAD (Where's All the Data) files. Kumar reports an average frame rate at a 320×240 resolution, which is very playable.


