


Overview
Designed for industrial and smart agriculture applications, the Arduino Edge Control Enclosure Kit is the perfect companion for Arduino Edge Control. It provides the module with a sturdy case that protects it from the elements, dust, and accidental blows. It is IP40-certified and compatible with DIN rails, making it safe and easy to fit in any standard rack or cabinet.
On top of this, the Arduino Edge Control Enclosure Kit features a 2-row/16-character LCD display with white backlight and a programmable push button, so it can be customized by users to instantly visualize sensor data, such as weather conditions and soil parameters. Different data can be displayed at every push of the button, on the spot and in real time, without requiring connectivity.
Key benefits include:
- Sturdy and compact protective case for outdoor/industrial use
- Easy installation and organization in racks or cabinets
- IP40-certified protection
- LCD display to instantly check sensor data on location
- Customizable push button to view different data in rotation
- Monitor data even when the connection is unavailable or unreliable
Ready to get started with the Edge Control Enclosure Kit? Read the product datasheet, tutorials and documentation on Arduino Docs.
*The boards/shields are not included in the product: Pictures shown are for illustration purposes only.
Arduino Edge Control
The Edge Control is Arduino Pro’s remote monitoring and control solution, optimized for outdoor environments. Find out more.
Arduino IoT Cloud
Integrating with Arduino’s IoT Cloud is a simple and fast way to ensure secure communication for all of your connected Things.
TRY THE ARDUINO IOT CLOUD FOR FREE
Need Help?
Check the Arduino Forum for questions about the Arduino Language, or how to make your own Projects with Arduino. If you need any help with your board, please get in touch with the official Arduino User Support as explained in our Contact Us page.
Warranty
You can find your board warranty information here.
Tech specs
| Interfaces |
|
| Included components |
|
| Dimensions | 110x90x60 mm |
| Weight | 165 g |
| Ingress Protection | IP40 |
| Operating Temperatures | -40° C to +85° C (-40° F to 185°F) |
Resources for Safety and Products
Manufacturer Information
The production information includes the address and related details of the product manufacturer.
Arduino S.r.l.
Via Andrea Appiani, 25
Monza, MB, IT, 20900
https://www.arduino.cc/
Responsible Person in the EU
An EU-based economic operator who ensures the product's compliance with the required regulations.
Arduino S.r.l.
Via Andrea Appiani, 25
Monza, MB, IT, 20900
Phone: +39 0113157477
Email: support@arduino.cc
Get Inspired

Syntaxx is powered by three Arduino boards, each handling specific functions to create a seamless and dynamic performance:
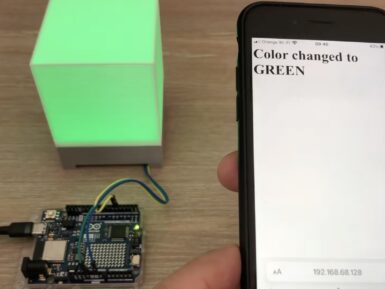
It can be tough to get started with building an Internet of Things (IoT) project from the ground-up, as getting connected, serving a webpage, and managing other devices can all be a challenge to a beginner. This is why the YouTuber known as “Mario’s Ideas” made an end-to-end tutorial that details everything one might need to build a smart RGB lamp. Because the Arduino UNO R4 WiFi contains an ESP32-S3 chip for its Wi-Fi radio and Renesas RA4M1 microcontroller, it was the perfect candidate. Mario’s sketch begins with a call to initialize the Wi-Fi module before attempting to connect to his local access point. Once finished, it enters a loop that continuously checks if a client has connected to the web server, and if one has, reads the requested path while also seeing if the string contains “/H” to denote an “ON” command to set the LED. Toggling an LED is useful, but Mario wanted to take things a step further by building a tangible — in this case a lamp. His 3D-printed enclosure features a recessed base and translucent cube for diffusing the light emitted by a grid of NeoPixels. Controlling the color was just as easy since any browser could still send a request path containing a color and get back the lamp’s updated status. To see more about this IoT lamp project, you can watch Mario’s video below!


