


Overview
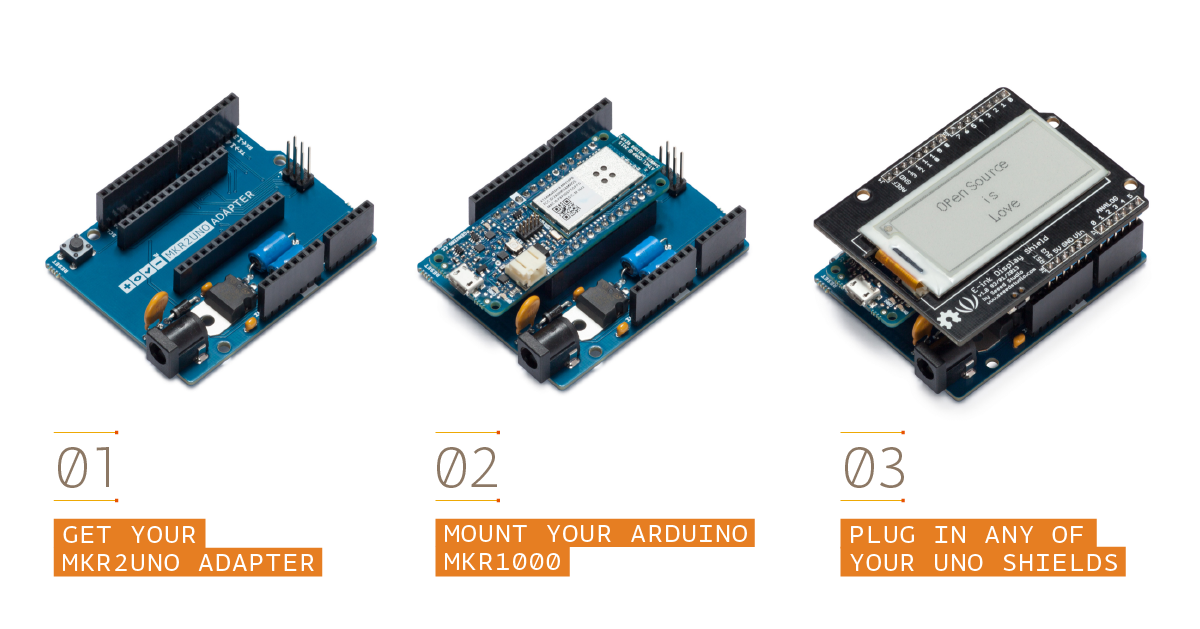
The MKR2UNO Adapter allows you to turn your Arduino UNO form factor based project into a MKR based one without too much effort! You can so upgrade your project with a powerful board with integrated LiPo battery charger.
Please note that currently the MKR2UNO adapter is compatible only with MKR1000 without headers
Need Help?
- On the Software on the Arduino Forum
- On Projects on the Arduino Forum
- On the Product itself through our Customer Support
Tech specs
| Operating Voltage | 3.3V |
| Input Voltage (recommended) | 7-12V |
| Input Voltage (limit) | 6-16V |
| Analog Input Pins | 6 |
| Analog Output Pins | 1 |
| Digital I/O Pins | 14 |
| DC Current for 3.3V Pin | 700 mA |
| DC Current for 5V Pin | 700 mA |
| Length | 68.6 mm |
| Width | 53.4 mm |
| Weight | 24 g |
Conformities
Resources for Safety and Products
Manufacturer Information
The production information includes the address and related details of the product manufacturer.
Arduino S.r.l.
Via Andrea Appiani, 25
Monza, MB, IT, 20900
https://www.arduino.cc/
Responsible Person in the EU
An EU-based economic operator who ensures the product's compliance with the required regulations.
Arduino S.r.l.
Via Andrea Appiani, 25
Monza, MB, IT, 20900
Phone: +39 0113157477
Email: support@arduino.cc
Documentation
OSH: Schematics
MKR2UNO is open-source hardware! You can build your own board using the following files:
EAGLE FILES IN .ZIP SCHEMATICS IN .PDF
Please keep in mind that the MKR2UNO is just a form factor adapter and so is NOT present any voltage translation. Be careful before connecting a shield since shield without IOREF level shifting capability may not work properly.
Like in many others Arduino boards this adapter allows to power your MKR board using a barrel jack with center positive polarity or the VIN pin on the headers.
Unlike the Arduino UNO, the MKR2UNO Adapter do NOT have I2C signals on A4 and A5 and SPI on pins 11, 12 and 13.
All the pins on the MKR2UNO Adapter are wired one to one from the MKR to the UNO form factor with some exception:
Get Inspired

In a world where energy bills are climbing and the environment is on our minds, keeping tabs on how we use energy at home has become a smart move. Every gadget we plug in impacts our wallets and the planet. That's where home energy monitoring comes in – giving us real-time info on how we're using energy, so we can save money and do our bit for the Earth. This post delves into home energy monitoring, spotlighting how to track your energy consumption using the Arduino Cloud and a Tuya-compatible energy meter with Node-RED acting as a middleware. What's the deal with home energy monitoring? Home energy monitoring is all about watching how much energy we're using at home. It's not just about paying the bills; it's about knowing what's eating up energy, so we can be smarter about it. Why does it matter? Well, first off, it helps us be more aware. When we can see which devices are energy hogs (looking at you, always-on TV), we can take action. And with energy costs going up, finding ways to save money is a no-brainer. Plus, with everyone talking about being green these days, knowing where your energy goes is like a badge of honor for doing your part. The ingredients The key component in this setup is an energy meter designed to monitor both real-time and cumulative power consumption, along with metrics such as voltage and current. This meter is installed within your home's electrical distribution board. Tuya-compatible devices have gained widespread popularity due to their affordability, user-friendliness, and seamless management through the SmartLife application. Moreover, these devices can also be seamlessly integrated into alternative platforms through the utilization of the Tuya API. The Arduino Cloud stands out as a versatile and user-friendly IoT platform, supporting a wide range of hardware. It's not only customizable and adaptable to suit different purposes and use cases, but it also streamlines the incorporation of multiple devices,


