


Grove Shield for Arduino Nano
Grove Shield for Arduino Nano provides you a simple way to connect with Arduino Nano.
This shield help you get rid of breadboard and jumper wires by pulling out the pins of the motherboard and expands to 8 Grove connectors.
Overview
This shield pulls out the pins of the motherboard and expands to 8 Grove connectors, including 3 Grove digital connectors, 3 Grove analog connectors, 1 Grove I2C connector, and 1 Grove UART connector.
With the help of the Grove system, you can connect hundreds of Grove sensors, Grove actuators and Grove displays to the Arduino Nano with a simple plug.
V1.1 Support List:
- Arduino Nano
- Arduino Nano Every
- Arduino Nano 33 IoT*
- Arduino Nano 33 BLE*
- Arduino Nano 33 BLE Sense*
*Attention:
To work with Arduino 33 serial boards, please switch the VCC power to 3.3V. If the VCC power supply is switched to 5V, the development board may be damaged!
Get Inspired
Using the Garmin LIDARLite v3HP, Arduino MKR WIFI 1010 and Pushsafer to detect an intruder and send a push notification to a smartphone.
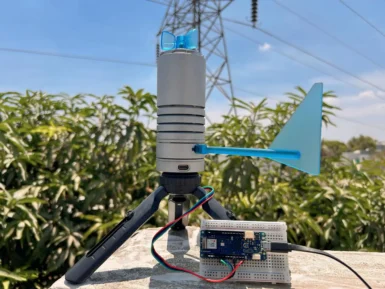
Being able to monitor the weather in real-time is great for education, research, or simply to analyze how the local climate changes over time. This project by Hackster.io user Pradeep explores how he was able to design a simple station outdoors that could communicate with a cloud-based platform for aggregating the sensed data. The board Pradeep selected is the Arduino MKR WiFi 1010 owing to its low-power SAM D21 microcontroller and Wi-Fi/BLE connectivity for easy, wireless communication. After configured, he connected a DFRobot Lark Weather Station, which contains sensors for measuring wind speed/direction, temperature, humidity, and barometric pressure — all in a compact device. Every second, the MKR WiFi 1010’s sketch polls the sensors for new data over I2C before printing it to USB. The cloud integration aspect was achieved by leveraging Qubitro’s platform to collect and store the data for later visualization and analysis. To set it up, Pradeep created a new device connection and copied the resulting MQTT endpoint/token into his sketch. Then once new data became ready, it got serialized into a JSON payload and sent to the topic where a variety of widgets could then show dials and charts of each weather-related metric. To read more about this DIY weather station, you can visit Pradeep’s project write-up here.


