


Overview
The possibilities are infinite with this Kit of essential Arduino components.
Prototype with the solderless breadboard to control sensors and actuators with Arduino.
You'll need some materials of your own as your progress through your project to make it really unique.
At the very least, you will need a 9V battery and a computer, but we recommend keeping some basic craft supplies handy - like paper, tape, markers and scissors.
Use the Arduino IDE and Arduino Project Hub for tutorials and projects!
Tech specs
The Kit includes:
- 1 USB cable
- 1 Breadboard
- 70 Solid core jumper wires
- 1 LED (Green)
- 1 LED (Yellow)
- 3 LEDs (Red)
- 5 Capacitors (10nF)
- 5 Capacitors (100nF)
- 5 Capacitors (100uF)
- 2 Transistors (BC547)
- 2 Optocouplers (4N35)
- 1 Potentiometer (10k ohm)
- 1 Mosfet Transistor (IRF520)
- 1 Diode (1N4007)
- 1 Thermistor (4,7k ohm)
- 1 Piezo Buzzer
- 5 Push Buttons
- 2 Tilt Sensors
- 1 Photoresistors
- 5 Resistors (330k ohm)
- 5 Resistors (10k ohm)
- 5 Resistors (2.2k ohm)
- 10 Resistors (220 ohm)
- 1 Male Headers Pins (40x1)
The Arduino UNO Rev3 board is nor included.
Resources for Safety and Products
Manufacturer Information
The production information includes the address and related details of the product manufacturer.
Arduino S.r.l.
Via Andrea Appiani, 25
Monza, MB, IT, 20900
https://www.arduino.cc/
Responsible Person in the EU
An EU-based economic operator who ensures the product's compliance with the required regulations.
Arduino S.r.l.
Via Andrea Appiani, 25
Monza, MB, IT, 20900
Phone: +39 0113157477
Email: support@arduino.cc
Get Inspired
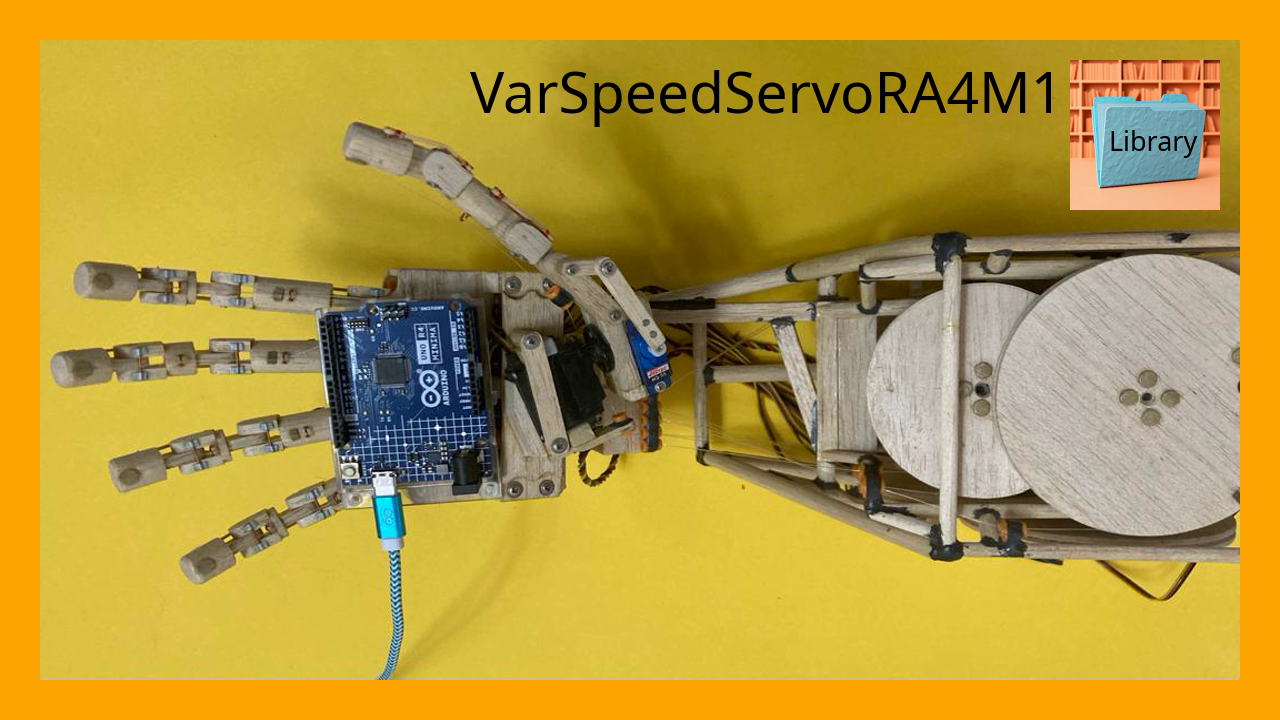
VarSpeedServoRA4M1 is a library for Arduino that enables precise control over servo motors, including speed, position, and movement sequences.

In robotics and several other disciplines, PID (proportional-integral-derivative) control is a way for systems with closed-loop feedback to adjust themselves according to sensor data without overshooting the target. Drones, for example, use PID control to remain stable without wild oscillations caused by over-correction. But implementing PID control can feel overwhelming, so Adam Soileau from element14 Presents built a simple robot for some experimentation. This robot’s only job is to drive forward until it sees a wall, then stop at a specific distance from that wall. That isn’t hard to achieve when a robot is moving at slow pace, because the code can tell the robot to stop moving the moment it reaches the target distance. But when moving fast, the robot has to take braking acceleration into account and that is much harder to predict. PID control is perfect for this situation, because it adjusts motor output in real-time according to the incoming sensor data. In this case, that sensor data comes from an ultrasonic rangefinder mounted to the front of the 3D-printed robot. An Arduino UNO R4 Minima board receives that data and controls the robot’s two motors through H-bridge drivers. That hardware is very straightforward so that Soileau could focus on the PID control. Tuning that is all about balancing the three constant values to get the desired performance. Soileau spent some time working on the Arduino sketch to get the PID control integrated and was eventually able to make the robot act like it should. If you’re interested in using PID control in your next robotics project, then Soileau's video should help you get started.


