


Overview
Learn the basics of electronics by assembling manually your Arduino UNO, become familiar with soldering by mounting every single component, and then unleash your creativity with the only kit that becomes a synth!
The Arduino Make Your UNO kit is really the best way to learn how to solder. And when you are done, the packaging allows you to build a synth and make your music.
A kit with all the components to build your very own Arduino UNO and audio synthesizer shield.
The Make Your UNO Kit comes with a complete set of instructions in a dedicated content platform. This includes video material, a 3D interactive viewer for following detailed instructions, and how to program your board once it is finished.
Enhance your experience with the Make Your UNO Soldering Bundle: it includes the Arduino Make Your UNO Kit and all the needed tools to build a soldering station at home.
Tech specs
This kit contains:
- Arduino Make Your UNO
- 1 x Make Your UNO PCB
- 1 x USB C Serial adapter Board
- 7 x Resistors 1k Ohm
- 2 x Resistors 10k Ohm
- 2 x Resistors 1M Ohm
- 1 x Diode (1N4007)
- 1 x 16MHz Crystal
- 4 x Yellow LEDs
- 1 x Green LED
- 1 x Push-Button
- 1 x MOSFET
- 1 x LDO (3.3V)
- 1 x LDO (5V)
- 3 x Ceramic capacitors (22pF)
- 3 x Electrolytic capacitors (47uF)
- 7 x Polyester capacitors (100nF)
- 1 x Socket for ATMega 328p
- 2 x I/O Connectors
- 1 x Connector header 6 pins
- 1 x Barrel jack connector
- 1 x ATmega 328p Microcontroller
- Arduino Audio Synth
- 1 x Audio Synth PCB
- 1 x Resistor 100k Ohm
- 1 x Resistor 10 Ohm
- 1 x Audio amplifier (LM386)
- 1 x Ceramic capacitors (47nF)
- 1 x Electrolytic capacitors (47uF)
- 1 x Electrolytic capacitors (220uF)
- 1 x Polyester capacitor (100nF)
- 4 x connectors pin header
- 6 x potentiometer 10k Ohm with plastic knobs
- Spare parts
- 2 x Electrolytic capacitors (47uF)
- 2 x Polyester capacitor (100nF)
- 2 x Ceramic capacitors (22pF)
- 1 x Push-Button
- 1 x Yellow LEDs
- 1 x Green LED
- Mechanical parts
- 5 x Spacers 12mm
- 11 x Spacers 6mm
- 5 x screw nuts
- 2 x screws 12mm
*This kit doesn’t include soldering iron or soldering tin.
Resources for Safety and Products
Manufacturer Information
The production information includes the address and related details of the product manufacturer.
Arduino S.r.l.
Via Andrea Appiani, 25
Monza, MB, IT, 20900
https://www.arduino.cc/
Responsible Person in the EU
An EU-based economic operator who ensures the product's compliance with the required regulations.
Arduino S.r.l.
Via Andrea Appiani, 25
Monza, MB, IT, 20900
Phone: +39 0113157477
Email: support@arduino.cc
Documentation
Learn more
Get Inspired

Exploring the digital twin synthetic data generation and AI-oriented advancements on real-world shipping operations w/ NVIDIA Omniverse.
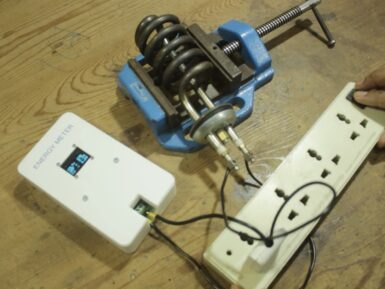
The primary appeal of microcontrollers is their versatility. They are, essentially, the embedded equivalent of computers — general purpose devices that can perform a wide range of functions. And to get the most out of a microcontroller, you’ll also want connectivity suitable for your application. That’s why we released the Arduino Nano Matter and YouTuber Mr Innovative has shared a great video illustrating how easy it is to build an energy meter using this new development board. The Nano Matter is based on the powerful Silicon Labs MGM240S, which has an Arm Cortex-M33 processor and support for a number of wireless connectivity options, including 802.15.4 (Zigbee and Thread), Bluetooth® Low Energy 5.3, Bluetooth® Mesh, and Matter. That makes the Nano Matter perfect for smart home and other Internet of Things applications. To demonstrate that, Mr Innovative created an energy meter that would be useful to many people around the world. This unit monitors the power flowing to any device or appliance connected to mains AC power. It displays information about that power consumption on a small OLED screen, and also sends the data over Bluetooth to a connected smartphone for logging. The Nano Matter can’t monitor mains AC voltage directly, so Mr Innovative used a ZMCT103C current transformer for the job. The Arduino receives its power from a 9V battery and the components fit inside a 3D-printed enclosure. A printed sticker label gives that a nice, smooth top finish.
FAQs
Do I need extra components apart from the ones contained in the kit?
No extra components are needed, however take into account that soldering iron and soldering tin are not included in the kit.
Where can I find the step by step guide?
The step by step guide can be found at makeyouruno.arduino.cc
Can I use any other shield with the Make Your UNO board?
Yes, the Make your UNO board is compatible with shields that are compatible with the Arduino UNO R3.


