


Overview
Write messages and add graphics with this shield.
A ready to use library with examples and methods is available for use to easily write static and scrollable text.
You can use this shield to show values from your board and is controllable from the Arduino IoT cloud. No need of solder, or special adapters, just plug the RGB matrix shield on top of your favourite MKR board and you are ready to go!
The mounted LED's are very dense and bright, with full RGB colours!
Don't miss our getting started guide that explains everything you need to use the shield!
Tech specs
| LEDs | 84 RGB APA102 |
| Input Volatge | 5V |
| Operating Voltage | 3.3V |
| Maximum Current | 2.5A |
| Communication | SPI |
| Length | 61.5 mm |
| Width | 27 mm |
| Weight | 32 gr. |
Conformities
Resources for Safety and Products
Manufacturer Information
The production information includes the address and related details of the product manufacturer.
Arduino S.r.l.
Via Andrea Appiani, 25
Monza, MB, IT, 20900
https://www.arduino.cc/
Responsible Person in the EU
An EU-based economic operator who ensures the product's compliance with the required regulations.
Arduino S.r.l.
Via Andrea Appiani, 25
Monza, MB, IT, 20900
Phone: +39 0113157477
Email: support@arduino.cc
Documentation
OSH: Schematics
The Arduino MKR RGB Sheld is open-source hardware! You can build your own board using the following files:
EAGLE FILES IN .ZIP SCHEMATICS IN .PDFLearn more
Get Inspired
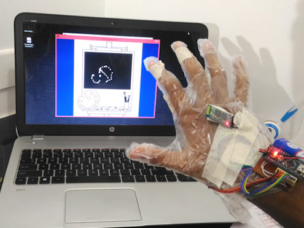
While touchscreens are nice, wouldn’t it be even better if you could simply wave your hand to your computer to get it to do what you want? That’s the idea behind this Iron Man-inspired gesture control device by B. Aswinth Raj. The DIY system uses an Arduino Nano mounted to a disposable glove, along with hall effect sensors, a magnet attached to the thumb, and a Bluetooth module. This smart glove uses the finger-mounted sensors as left and right mouse buttons, and has a blue circle in the middle of the palm that the computer can track via a webcam and a Processing sketch to generate a cursor position. You can see it demonstrated in the video below, drawing a stick man literally by hand, and also controlling an LED on the Nano. Check out this write-up for code and more info on the build!


