


Overview
The DFRobot Expansion shield introduced to the market the famous color code for sensors and actuators input and output. The 3 pin format for Signal, Voltage and Ground is extremely useful, specially if used altogether with our increasingly large range of modules, sensors and devices that just fit. Alternatively, the board includes power input for salvaged power supplies or laboratory power supplies. Very common Xbee socket for multipurpose wireless connectivity such as RF, wireless, bluetooth.
The new version includes a voltage hardware setting through a jumper to allow compatibility with a bigger range of components at 3.3v. It also includes a Servo external power, with a protective diode. This way you can enable a large range of servos from your Arduino.
Latest version features a convenient switch that lets you program your ATmega328 boards like UNO, while you have another Serial device connected like a Xbee. Switch it, program it and get it back up and running with another switch. You don't need to disassemble your hardware or wiring. A LED on top board and a reset button is in order to make it just a natural extension to Arduino boards. The LED is connected to pin 13.
Features:
- Compatible with the Arduino Due
- 3.3V/5V operating voltage select
- Switch for wireless communication & programme
- More Easily recognitive interfaces
- Colorful header for illustrating digital or analog pins
- Immersion gold surface
Tech specs
- Input Voltage
- 7-12V, PWR_IN
- 4.8-6V, SERVO_PWR, depending on your servo
- Compatible module voltage: 5V/3.3V
- Support interface: I2C, SPI, Xbee (Xbee pro), Bluetooth, APC220
Get Inspired
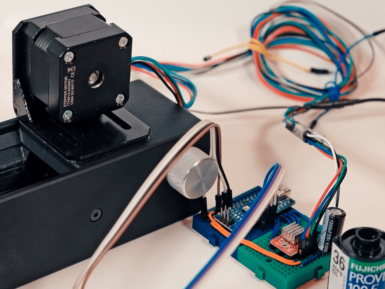
While taking photos today is normally a digital affair, there is a wealth of visual information stored on film negatives. Digitization is possible, but it tends to be rather time-intensive, so photographer/hacker Seckin Sinan Isik decided to automate the process. His setup uses a film carrier augmented with a stepper motor and belt drive to advance the 35mm film under a tripod-mounted digital camera. This is controlled by an Arduino Nano, with the camera’s view shown via a video capture device on a nearby computer. In one mode, the user can adjust the film position semi-manually using pushbuttons, then scan the negative. The whole process can also be automated, with a Python computer vision routine. More details on the project can ben found in Isik's PetaPixel article here.


