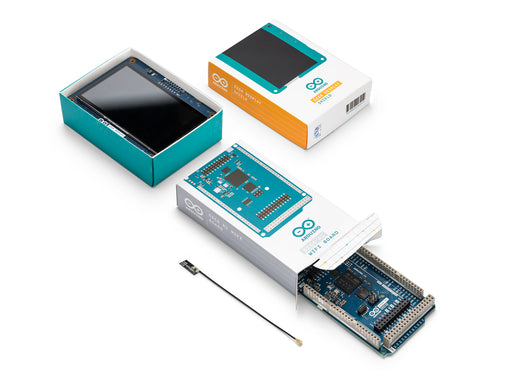
Arduino GIGA Display Shield
Save 20%With the Arduino GIGA Display Shield, effortlessly deploy graphic interfaces to your Arduino GIGA R1 WiFi projects using our innovative touch screen solution, which includes a digital microphone, 6-axis IMU, and Arducam® connector, enabling seamless creation of handheld devices or dashboards.
Overview
Introducing the GIGA Display Shield, a touch screen solution designed to effortlessly deploy graphic interfaces in your projects. Leveraging the new pin header connector in the middle of GIGA R1 WiFi, this shield offers seamless integration and enhanced functionalities.
With the GIGA Display Shield, you gain access to an array of features, including a digital microphone, 6-axis IMU, and Arducam connector. These added capabilities allow you to fully utilize the other 54 available pins, making it incredibly convenient to create handheld devices or dashboards to control your project.
Experience the convenience of building intuitive interfaces with ease, thanks to the GIGA Display Shield's user-friendly design and comprehensive features. Elevate your project's functionality and user experience with this cutting-edge solution.
 Unlock your inner innovator and craft a unique shield for your GIGA WiFi R1 and GIGA Display Shield! With 3D printing, you can design a custom protection case tailored to your style. Check out our tutorial and get started on your DIY journey.
Tech specs
| Board | Name | Arduino® GIGA Display Shield |
| SKU | ASX00039 | |
| Connectors | Camera | SOCKET 2ROW 20POS VERTICAL PASS THROUGH (Arducam compatible) |
| Display Video | F32Q-1A7H1-11020 | |
| Display Touch | F32Q-1A7H1-11008 | |
| Display | KD040WVFID026-01-C025A | |
| Size | 3.97” | |
| Resolution | 480x800 RGB | |
| Color | 16.7M | |
| Touch Mode | Five points and Gestures | |
| Interface | I2C | |
| Sensors | IMU | BMI270 |
| Microphone | MP34DT06JTR | |
Conformities
Resources for Safety and Products
Manufacturer Information
The production information includes the address and related details of the product manufacturer.
Arduino S.r.l.
Via Andrea Appiani, 25
Monza, MB, IT, 20900
https://www.arduino.cc/
Responsible Person in the EU
An EU-based economic operator who ensures the product's compliance with the required regulations.
Arduino S.r.l.
Via Andrea Appiani, 25
Monza, MB, IT, 20900
Phone: +39 0113157477
Email: support@arduino.cc
Documentation
Learn more
Get Inspired

Syntaxx is powered by three Arduino boards, each handling specific functions to create a seamless and dynamic performance:
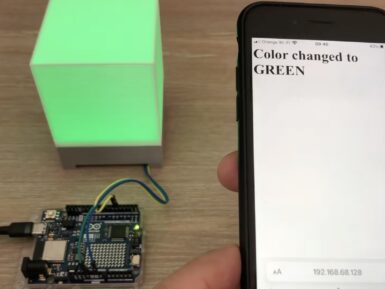
It can be tough to get started with building an Internet of Things (IoT) project from the ground-up, as getting connected, serving a webpage, and managing other devices can all be a challenge to a beginner. This is why the YouTuber known as “Mario’s Ideas” made an end-to-end tutorial that details everything one might need to build a smart RGB lamp. Because the Arduino UNO R4 WiFi contains an ESP32-S3 chip for its Wi-Fi radio and Renesas RA4M1 microcontroller, it was the perfect candidate. Mario’s sketch begins with a call to initialize the Wi-Fi module before attempting to connect to his local access point. Once finished, it enters a loop that continuously checks if a client has connected to the web server, and if one has, reads the requested path while also seeing if the string contains “/H” to denote an “ON” command to set the LED. Toggling an LED is useful, but Mario wanted to take things a step further by building a tangible — in this case a lamp. His 3D-printed enclosure features a recessed base and translucent cube for diffusing the light emitted by a grid of NeoPixels. Controlling the color was just as easy since any browser could still send a request path containing a color and get back the lamp’s updated status. To see more about this IoT lamp project, you can watch Mario’s video below!
FAQs
Is this display multitouch-enabled?
Yes, the display supports up to 5 simultaneous touch points.
How do I connect the GIGA Display Shield to the GIGA R1 WiFi?
The GIGA Display Shield connects via the middle headers (J5 and J6) on the GIGA R1 WiFi. Attach the shield from the bottom, leaving the top side of the GIGA R1 WiFi available for additional shields.
Will I still have access to all pins when the display is attached?
Yes, you will retain access to all pins on the top side of the board (54 pins) even when the display is connected.
Does the shield require an external power supply?
No, the GIGA Display Shield does not require an external power supply. It is powered directly through the connection.
Which cameras are compatible with the shield?
The GIGA Display Shield is fully compatible with 20-pin DVP cameras from Arducam, such as the OV7675. For more information, visit the Arducam catalog of compatible cameras.
In which direction is the camera connector oriented?
The camera connector pinout is configured to ensure that compatible Arducam models face the same direction as the screen, resembling a selfie mode for a seamless and user-friendly experience.