


Overview
The DFRobot Expansion shield introduced to the market the famous color code for sensors and actuators input and output. The 3 pin format for Signal, Voltage and Ground is extremely useful, specially if used altogether with our increasingly large range of modules, sensors and devices that just fit. Alternatively, the board includes power input for salvaged power supplies or laboratory power supplies. Very common Xbee socket for multipurpose wireless connectivity such as RF, wireless, bluetooth.
The new version includes a voltage hardware setting through a jumper to allow compatibility with a bigger range of components at 3.3v. It also includes a Servo external power, with a protective diode. This way you can enable a large range of servos from your Arduino.
Latest version features a convenient switch that lets you program your ATmega328 boards like UNO, while you have another Serial device connected like a Xbee. Switch it, program it and get it back up and running with another switch. You don't need to disassemble your hardware or wiring. A LED on top board and a reset button is in order to make it just a natural extension to Arduino boards. The LED is connected to pin 13.
Features:
- Compatible with the Arduino Due
- 3.3V/5V operating voltage select
- Switch for wireless communication & programme
- More Easily recognitive interfaces
- Colorful header for illustrating digital or analog pins
- Immersion gold surface
Tech specs
- Input Voltage
- 7-12V, PWR_IN
- 4.8-6V, SERVO_PWR, depending on your servo
- Compatible module voltage: 5V/3.3V
- Support interface: I2C, SPI, Xbee (Xbee pro), Bluetooth, APC220
Get Inspired
Robot using Arduino Nano 33 BLE Camera Shield.
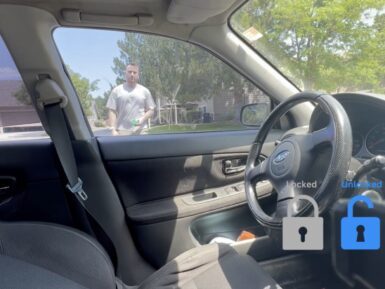
A lot of newer cars have a really nifty feature called “proximity unlock,” which automatically unlocks the doors when the driver approaches while carrying their key fob. When paired with a push-to-start ignition switch, the driver never has to take their keys out of their pocket. But Nick’s 2004 Subaru STI is too old to have come with that feature from the factory, so he used a couple of Arduino boards to create a DIY proximity unlock system. Car manufacturers need to pay serious attention to security when designing their access and ignition systems, but Nick had a bit more freedom. It is unlikely that any thieves would suspect his car of possessing a feature like this and so they wouldn’t even bother trying to hack it. Nick’s proximity unlock works by evaluating the received signal strength indicator (RSSI) of Bluetooth® Low Energy connection. If all else is equal, RSSI is inversely proportional to distance and that makes it useful for rough proximity detection. An Arduino Nano 33 BLE inside the car unlocks the doors when it has an active BLE connection with an RSSI over a set threshold. It unlocks the doors by shorting the switch with a 12V relay and it receives power from the car’s 12V system through a buck converter. The driver-carried device (equivalent to a key fob) can be either another Nano 33 BLE or Nick’s smartphone. In fact, it can be any device with a BLE adapter, so long as it can connect to the in-car Arduino with the proper device name. Now, Nick can enjoy his classic car and the convenience of proximity unlock.


