


Overview
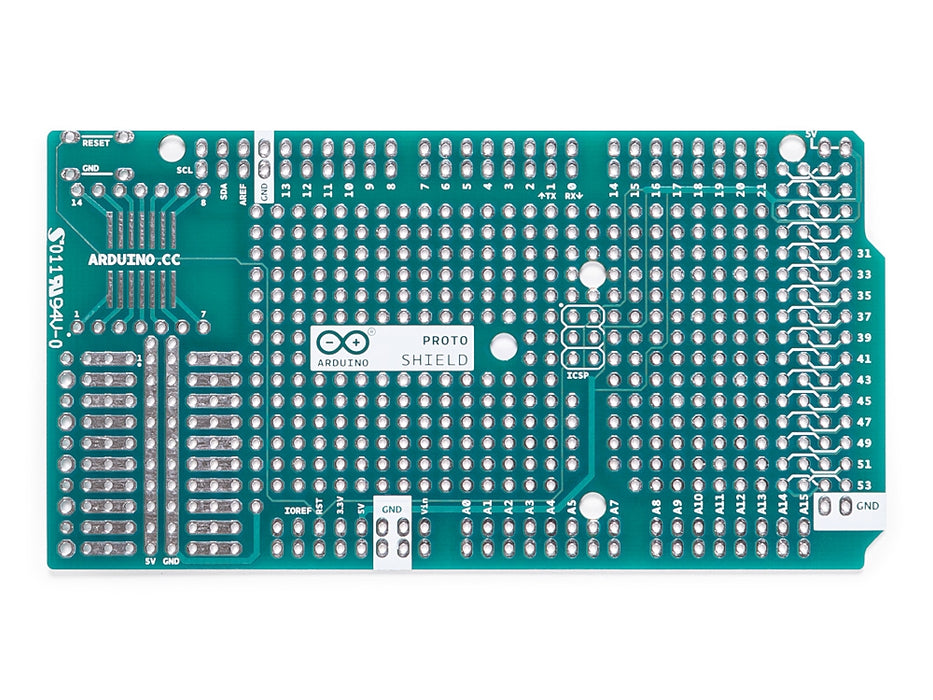
The Arduino Prototyping Shield makes it easy for you to design custom circuits. You can solder parts to the prototyping area to create your project,or use it with a small solderless breadboard (not included) to quickly test circuit ideas without having to solder. It's got extra connections for all of the Arduino MEGA I/O pins, and it's got space to mount through-hole and surface mount integrated circuits. It's a convenient way to make your custom Arduino circuit into a single module.
Getting Started
You can find in the Getting Started section all the information you need to configure your board, use the Arduino Software (IDE), and start tinker with coding and electronics..
Need Help?
- On the Software on the Arduino Forum
- On Projects on the Arduino Forum
- On the Product itself through our Customer Support
Tech specs
General
| PCB Size | 101.5 x 53.3 mm |
| Weight | 0.013 Kg |
Conformities
Resources for Safety and Products
Manufacturer Information
The production information includes the address and related details of the product manufacturer.
Arduino S.r.l.
Via Andrea Appiani, 25
Monza, MB, IT, 20900
https://www.arduino.cc/
Responsible Person in the EU
An EU-based economic operator who ensures the product's compliance with the required regulations.
Arduino S.r.l.
Via Andrea Appiani, 25
Monza, MB, IT, 20900
Phone: +39 0113157477
Email: support@arduino.cc
Documentation
OSH: Schematics
The Arduino Mega Proto Shield is open-source hardware! You can build your own board using the following files:
EAGLE FILES IN .ZIP SCHEMATICS IN .PDF
Description
Board features as follows:
- 1.0 Arduino pinout
- 1 Reset button
- 1 ICSP connector
- 14 pins SMD footprint (50 mils pitch)
- 32 double row through Hole pads, standard Arduino breakout layout
- Proto aerea with multiple THT pads, 100 mils pitch
Power
The Proto Shield bring the power from the Arduino standard 5V and GND pins to the two power bus rows placed between the Through Hole package footprint, which can be used for powering the DIP sockets, or for power and ground rows.
Physical Characteristics
The maximum length and width of the Proto Shield PCB are 2.7 and 2.1 inches respectively. Three screw holes allow the shield to be attached to a surface or case. Note that the distance between digital pins 7 and 8 is 160 mil (0.16"), not an even multiple of the 100 mil spacing of the other pins.
SPI Connection
On the ICSP connector only 5V, GND and RST are wired to the respective pins on the header. MOSI and MISO are present only on the connector pads. For more information about the SPI communication see the SPI library.
Get Inspired

A simple BlueTooth (BLE) remote controller for the Arduino Alvik robot, implemented in MicroPyhton
The brand new Nano Screw Terminal Adapter turns up the speed on your prototyping efforts by giving you a fast, reliable way to hook up your boards. This awesome add-on is exactly what seasoned makers have been crying out for, and is now available from the Arduino Store. Let’s take a look at this mini mechanical marvel. A solderless solution With a finished project, you’re likely to make permanent connections to your Nano by soldering it. Even if you’re connecting it using a header strip, the wires, components, sensors and accessories will be soldered, crimped or attached in a permanent way to the controller side of your project. It makes perfect sense to do this, when you’re looking for a reliable connection. The trouble with permanent connections like this is that they’re… well, permanent! Soldering and de-soldering during the design and prototyping stage can become a real chore. And it’s not good for the components or the board itself, either. The Screw Terminal Adapter is what you need. It’s something we’ve been asked for a lot, giving people a way to make robust, fast, easy connections that can be changed just as easily. Easy access to all I/Os The Nano Screw Terminal Adapter features a double row of headers. The Nano drops into the two inner rows, giving you a second, outer set that lets you connecting using jumpers, wires or what have you. Then you have a third row of connectors on either side of the adapter with a screw terminal for each pin. The perfect way to connect wires or components in a reliable, but easily changeable way. It’s never been easier to develop and design a project that with these connection options. There’s even a 9x8 prototyping area with through plated holes for adding extra components, connections or accessories. Of course, this doesn’t have to only be for prototyping. The screw terminal is a long-established, trusted connection option, so there’s no reason it can’t become a


